For those of you who weren't able to attend, below are the directions for making the book, along with some of my photos. (My camera's battery ran out before I could get great pictures, but hopefully they will help somewhat.)
Accordion ‘un’ stitched Bound Book
The directions are for a 5" x 6" book, with 8 pages with .5 binding
1. Start by cutting a paper size - 42 x 6 inch
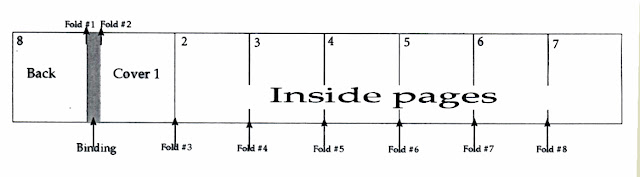
a. Make first marking 5 inches, this will be the back page of the book.
b. 2nd mark is the .5 from first. This will be the binding.
c. The rest of pages are all marked at the 5 inch.
d. There will have an extra 1.5 inches - this can be cut off before folding.
Final size - 40.5

Create folds at marks
*NOTE - Using a bone folder will help maintain sharp edges.
2. Fold #1, #2 and #3 (the cover, back and binding folds) all fold the same direction, inward.
3. Fold # 4 begins the accordion fold. It folds the opposite direction from fold #3.
4. This point on each fold will fold in the opposite direction from the previous.

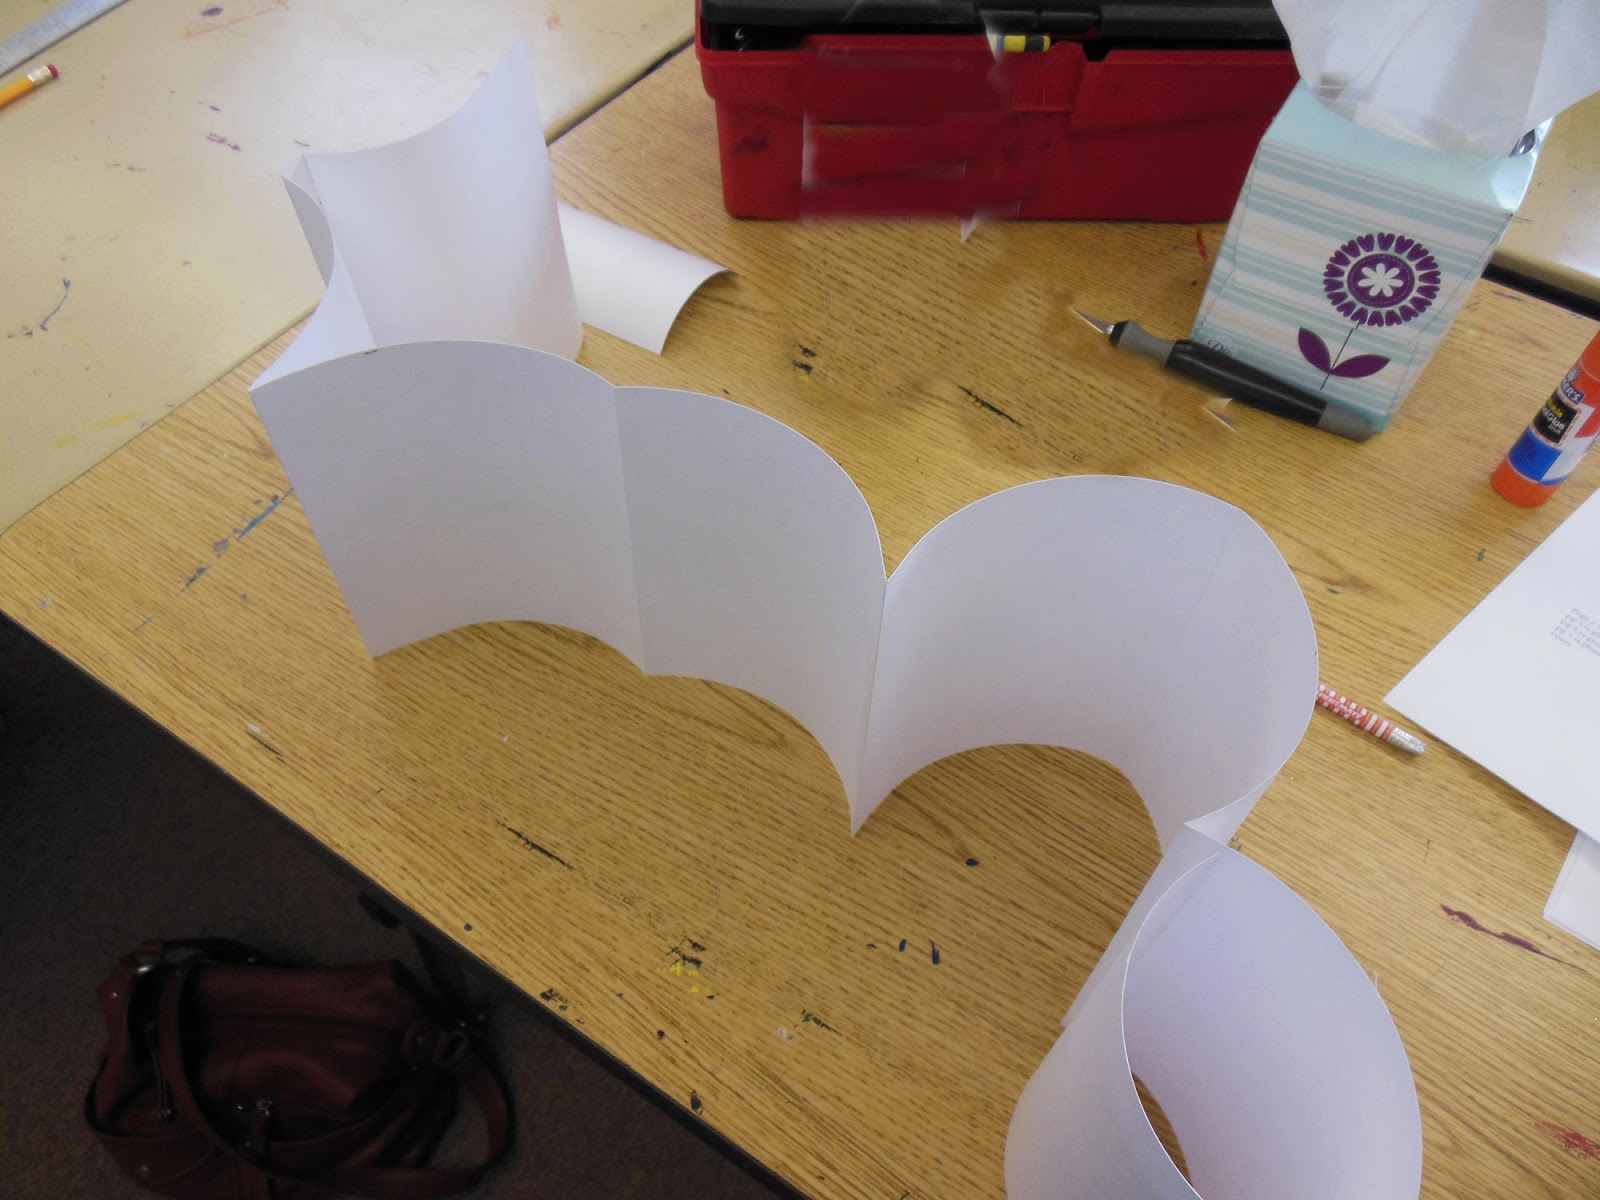
Here is what it should look like folded. This is a bit curled because the paper was from a roll.

Glueing book

5. Pg 2 to the cover
Pg 3 to pg 4
Pg 5 to pg 6
Pg 7 to the back (pg8)
6. Pages need to be pressed after glue is set. Place between a stack of heavy objects. Important to put book in a clean sheet of paper to protect any art work.
Helpful Tips
a. You need an even number of pages for the book to come out even.
b. Binding width will depend on thickness of paper and content of book.
c. If using smaller paper sizes such as 11x17, can successfully connect by adjusting with an
additional .5 to 1in hem. This will be hidden after pages are glued together.
d. Can adjust to as many pages as are needed. Will need to adjust binding to
accommodate the extra pages.
e. Can print images right on the paper or can collage after basic form is created.
f. Working options
• Flat and then fold.
• Working individual pages.
Here is my mostly finished book. I'm showing two views so you can have some idea of how many pages there are. (please excuse my messy table:))


If anyone is interested in seeing more photos from the day, check out Carolyn's flickr account -
http://www.flickr.com/photos/vintagepix/sets/72157604596043683
Our next meeting is July 13th, from 10am - Noon. Christine will be demonstrating. More info. on what will be need in later blogs.
Have a wonderful, creative week!
Quote of the Week: "I'd rather be a failure at something I love than a success at something I hate."-
George Burns
The directions are for a 5" x 6" book, with 8 pages with .5 binding
1. Start by cutting a paper size - 42 x 6 inch

Mark off pages - (See diagram above.)
a. Make first marking 5 inches, this will be the back page of the book.
b. 2nd mark is the .5 from first. This will be the binding.
c. The rest of pages are all marked at the 5 inch.
d. There will have an extra 1.5 inches - this can be cut off before folding.
Final size - 40.5

*NOTE - Using a bone folder will help maintain sharp edges.
2. Fold #1, #2 and #3 (the cover, back and binding folds) all fold the same direction, inward.
3. Fold # 4 begins the accordion fold. It folds the opposite direction from fold #3.
4. This point on each fold will fold in the opposite direction from the previous.

Here is what it should look like folded. This is a bit curled because the paper was from a roll.
Glueing book

5. Pg 2 to the cover
Pg 3 to pg 4
Pg 5 to pg 6
Pg 7 to the back (pg8)
6. Pages need to be pressed after glue is set. Place between a stack of heavy objects. Important to put book in a clean sheet of paper to protect any art work.
Helpful Tips
a. You need an even number of pages for the book to come out even.
b. Binding width will depend on thickness of paper and content of book.
c. If using smaller paper sizes such as 11x17, can successfully connect by adjusting with an
additional .5 to 1in hem. This will be hidden after pages are glued together.
d. Can adjust to as many pages as are needed. Will need to adjust binding to
accommodate the extra pages.
e. Can print images right on the paper or can collage after basic form is created.
f. Working options
• Flat and then fold.
• Working individual pages.
Here is my mostly finished book. I'm showing two views so you can have some idea of how many pages there are. (please excuse my messy table:))


If anyone is interested in seeing more photos from the day, check out Carolyn's flickr account -
http://www.flickr.com/photos/vintagepix/sets/72157604596043683
Our next meeting is July 13th, from 10am - Noon. Christine will be demonstrating. More info. on what will be need in later blogs.
Have a wonderful, creative week!
Quote of the Week: "I'd rather be a failure at something I love than a success at something I hate."-
George Burns