Sunday, November 23, 2014

2014 Binders Guild Show

Hard to believe there is only one week left for our show.  It seemed like yesterday I was running around trying to get everything done.

If you haven't seen, here's a few pictures:


Thanks to everyone who participated!


Wednesday, October 1, 2014

September Meeting Recap

Hello Everyone,

Several people turned in their Summer pages that were due at the August meeting.  (If you haven't turned yours in and would like to participate, please bring your Spring and Summer page to Fall page's due date.)  The Fall page will be due at the November 8th meeting.

Lots of discussion concerning the show:

Nancy does need to have a final tally of all the people who will be in the show.  So if you have not done so, please email her and let her know. 

Drop off time for your work is Sunday, November 2nd, from 9am to Noon or Monday, November 3rd, from 9am to Noon, at the gallery.

Please make sure you include a price sheet (sample on earlier post) of all your work.  Also please don't forget to include notes on any special hanging instructions needed.  Since this is a book show, if there is a book you do not want people to touch, please put "please put under glass"  in the hanging instructions.

Each piece should be given a price.  If you do not wish to sell something, just put NFS (not for sale) in the price line.

Artists are responsible for their own sales.  So, in order to buy a book, the customer will need to contact you.  You will need to provide a contact information sheet with your work.  It is important to remember that the work needs to stay in the gallery until the show is over.

For our canvas piece, and any other hanging piece you may have, should have the eye screw and wire on the back.  No sawtooth holders or hooks, etc.

We are allowed to have up to 12 pieces in the show.  We would like everyone to contribute:  an ABC book, Box of Curiosity and 12"x 12" Canvas piece.

Nancy is checking on the Reception date for the show.  We thought it best to have it on Friday, November 14th, from 6 - 8pm.  The amount for the food is $20 per artist.  Nancy is collecting the money.

The show runs till the end of November.  The pick-up date for work is December 1, from 9am-Noon.

Other buisness:

If you haven't had any experience with installing eye screws and wires on the backs of canvases.  Feel free to bring your canvas to our next meeting and someone will help with it.  The canvas doesn't need to be finished.

Also once again for our next meeting, we will be showing work for the show.  So please bring anything that you would like to have last minute feedback on or questions about how to hang, etc.

Our next meeting is scheduled for October 11th.  It is the last meeting before our work is due, so it should be quite energetic.  

Time to get to work!
Sheila


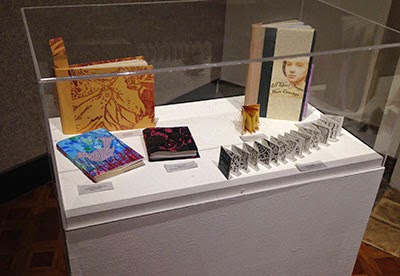
Various Works Shown at September Meeting 


Wednesday, August 20, 2014

Websites to Browse

Below are a couple of websites for book arts.  Check them out.

www.centerforbookarts.org  (link: CenterforBookArts)

www.philobiblon.com  (link:  Philobiblon)

Monday, August 18, 2014

August Meeting Recap

The meeting for August was small but fun.  I was not there, but Nancy was and has filled me on the details.

For our show at the end of October-November.  The work will need to be delivered to the gallery (located inside Mount Mary University) by approximately the week of October 19th.  Nancy is obtaining the finalized dates and will let us know exactly when things need to be in.  Our group pieces that will definitely be in the show are:
                  ABC Book
                  Curiosity Box
                  12" x 12" canvas
If you have any other pieces that you would like to submit, you can up to a total of 12.  Please also keep in mind that you will need to have a price list sheet for your work.  We plan on reviewing all the details, bring examples of price sheets, etc., and answer questions you may have at our September 12th meeting.

The group also did discuss printing issues.  Printing issues come up quite often in book design.  Nancy said she could give some detailed specifics about the printing process at a future meeting.  It would also be a great time to share any hints and tricks that you might have come with to deal with some of these problems.  I will put it on the calendar for sometime next year, and let everyone the specific date has been set.

The Summer page for our "Seasons" book was exchanged.  If you missed the meeting (like me) but still want to participate, don't worry.  We will have a page exchanged day before we actually bind the book.  Once again, this won't happen until next year.

Just a reminder, you can check out our Pinterest board at http://www.pinterest.com/vintagepix/binders-guild/ (link:  bindersguild pinterest)    

Our next meeting is September 12th at Artist and Display from 10am to Noon.  If you are planning to have work in the show, please plan on attending. If you are unable to attend but are planning to be in the show, please send an email to Nancy or me, so we can start to have a preliminary tally of who, what and how many for the show.


Wednesday, August 6, 2014

July Recap and August Meeting Reminder

The July meeting was mostly a working meeting.  Just a reminder that everyone should plan on creating a canvas for our show at the end of October.  The canvas should be 12" x 12" gallery wrapped.  The depth should be between 1 3/8" to 1 1/2.  And the subject is "Storytelling".

Also, just a reminder that our next meeting is this Saturday, August 9th, from 10am to Noon at Artist and Display.  It worked out very well last time and its a great space to meet.  

Our Summer Page to the "Seasons" book is due.  Please bring 15 copies to share.  The page should be 8 1/2" x 11", with both sides and horizontal (for hamburger fold).  If you were not able to start with the Spring Page but still would like to participate, no problem.  Just bring a Summer Page this time and when our Fall Page is due, you can catch up with the Spring Page.  (We will be binding this book some time after the new year, so it will not be in the show.)

Unfortunately, I will not be able to attend (My kids Karate school has there annual picnic that day.  I will try to stop in and drop my pages off and say hi before we leave.), but I will see everyone in September.

Saturday, June 28, 2014

June Meeting Recap

Hello Everyone,

Here's a recap of our last meeting on June 14th:

The meeting turned out to be a great Show-and-Tell day for the curiosity boxes, thanks to Betsy Rasmussen and Kathleen Kelly who both brought in wonderful finished pieces. 


Betsy Rasmussen


Kathleen Kelly


Here is some of the other work that was shared.  


Betsy Rasmussen


                                                     ABC Book


Nancy Lohmiller


Diane Judd


We also had an opportunity to look at the curiosity boxes that have been pinned to our Pinterest board. 

Nancy lead a great discussion with some helpful advice on creating your own Artist Statement about your work.  Starting with find three specific words that you or other people would use to describe your style and then building your story of why you create what you create.  You want to let people know what the ideas are behind your work, as well as, your motivation for making art.

We also reminded ourselves the importance of taking several photos of each piece we create.  


To that end, please remember our show is coming up soon (end of October).  We would like everyone to submit

1.  An ABC Book  
2.  A Curiosity Box and  
3. The 12" x 12" Canvas Piece.

Nancy is checking to see if it would be cost effective to buy the canvases in bulk and how much it will cost.

Just to review, our canvas piece will be a 12" x 12" gallery wrapped canvas.  The theme is "story-telling", but there are no limitations on materials or techniques.

Our next meeting is July 12th.

The "summer" page to our Seasons book will be due at the August meeting, August 9th.


Quote of the Week:  "Sometime, in a summer morning, having taken my accustomed bath, I sat in my sunny doorway from sunrise till noon, rapt in reverie." - Henry David Thoreau

Friday, June 6, 2014

Tab and Slot Book Demo

Hello Everyone,

I am finally able to catch up on our blog.  So sorry for the delay.

Here are the instructions for the Tab and Slot Book Demo that Dina was gracious enough to demonstrate at our April 12th meeting.


Tab and Slot Book

Materials

6 pieces of paper (the paper we used was 8 1/2" x 11" sheets, 3 were decorative paper, 3 solid color)
Paper Knife
Ruler
Pencil


Fold each paper in half, hamburger fold.  For 3 of the sheets, mark and cut approximately an inch from the top and bottom of the center fold.  For 3 of the sheets, mark an inch from the top and bottom of the center fold and cut a slot in between the two marks.

                                                       Slot cut 3                        Tab cut 3

Then insert a tab pages into a slot pages to the fold.


After that you can join the signatures together by inserting a tab page into a slot page until they are all joined.


And that's it!


Kathleen did a variation of this book at the May meeting.


Same technique but instead to make just slots the slots were made into shapes.

May Meeting Recap

A wonderful opportunity from Nancy:  the Door County Book Show.  Everyone is invited to contribute.  There is no fee to enter.  You can enter as many books as you would like.  The only requirement is that all work must be sellable.  You will also need to provide an artist bio-statment and contact information. Nancy has graciously volunteered to send the books the up north.  The drop off time is June 7th from 11 to 1pm in our meeting room, 4th floor NDH, Mount Mary University.  The pieces will be in Door County till about October/November, you should bring any older books or any books that you will not need for our show.  This is a wonderful opportunity to clear some inventory and make a little money.

For our June 14th meeting we will be working on our Curiosity Box projects.  We will also be doing a gallery walk-through to help plan for our show in October/November.  It is coming up quickly, so it will be nice to see the space and talk about what we will need to do for the show.

For the summer, we will continue to meet the second Saturday of the month.  So are meetings will be June 14th, July 12th and August 9th.

For the August 9th meeting, we will hold a Completion and Critique Workshop.  It will run a bit longer 10am-3pm.  It will be a chance for you to complete some of the books you've started or get feed back on books already done.  (It is not mandatory to stay the whole time.  Stay for as long as you can.)

Also for the August 9th meeting, the next page for our Seasons book will be due.  It is the Summer page.  8 1/2" x 11", both sides.  (Just a reminder, this book will be bound after the new year, it will not be in the show.)

Saturday, April 26, 2014

April 12th Meeting Recap

Hello Everyone,

Hopefully you had a wonderful Easter holiday.  I am especially grateful for the warmer weather and no snow.

Just a quick recap of our April 12th meeting.

Our group project, the “Seasons” book, got off to a great start.  Thanks everyone for bring in your Spring page.  :D   You will want to keep your traded pages secure.  Once we have all the pages for seasons traded, we will discuss how to assemble them into a bound book.  The Summer page will be due at our August or September meeting.

A big THANK YOU to Dina Leib for demonstrating the Tab and Slot and the Tea Bag book forms and providing the materials.  It was very inspirational.  I have posted photos of my finished books  and will be putting the demos of them up later this month.

Tab and Slot


Tea Bag


Dianna Reiter brought in her example of the Secret Belgium Binding Book.


It’s a beautiful sewn book binding but a bit tricky.  Or anyone whose interested in giving it a try on their own, I have posted a tutorial of the binding (from Erin Fletcher at herringbonebindery.com) on our Pinterest board.  (Pinterest board link:  Binders Guild Pinterest Board)


Chris Klein also shared with us another set of instructions for Hedi Kyle's Diagonal Pocket Book form.  This set of instructions came from the magazine Bound & Lettered, Fall 2013.  The article "Making a Paper Wallet" by Carol Bubosch has great instructions and very clear photos of what to do.

Our next meeting is May 10th  from 10am to Noon at Mt. Mary.  Chris Klein has volunteered to demonstrate the Secret Victorian Purse Fold.  For this you will need to bring a 9” x 9” text weight paper.  It can be printed on one side and white on the other.  This will make you a purse that is 3” square.  If you would like to make a 4” purse, the paper size should be 12” x 12”.

You will also need to bring a bone folder and just the regular supplies (pencil, ruler, scissors, etc.)

Happy Spring!
See everyone on the 10th.


Sheila

Friday, April 4, 2014

March Meeting Book Demo

For our meeting last March, I demonstrated how to make a kind of reverse painting technique and then turn that painting into a simple one-page folded book.  It's a very simple but complete book.

In the meeting we did a sun book:


But for my blog demo I thought I would make a star book using the same technique that we did for the sun book.

The Painting:

You start with just an ordinary piece of printer/copier paper.  (The paper should be light weight.)  

On the paper you will want to trace randomly about 5 to 7 medium circles.


For our sun book we left the circles white, but for this star book I decided to color in the circles a yellow.


Then I mixed a light blue acrylic paint with glazing medium, at about a 1part paint/2 parts medium ratio.  (Because every paint is different, you will want to test a sample on a scrap piece of paper before adding it to the actual work.  The paint should be translucent.  The color should be vibrant but you should be able to see through it.)

Paint around the circles.


You'll notice that you can see your brushstrokes.  That's part of the beauty of this technique.

The paint needs to dry before moving to the next step.

Next, I  traced randomly about 9 to 12 smaller circles, going inside and outside the yellow circles.  

I then took a darker blue acrylic paint and added to the glazing medium.  (Once again, you will want to check on a scrap piece of paper to make sure the mixture isn't too transparent or opaque.)

Then I painted around the smaller cirlces, ignoring what I had previously painted.  


You will have to wait again for the paint to dry before moving to the next step.

Next, using a template I made of a star shape, I traced several stars randomly around in pencil first and then went over it with silver marker.


As you can see the paper is rolling up on the ends slightly.  That's ok.  It will straighten out once it's weighted down after folding it into a book.

Wait for the paper to fully dry before folding it into the book form.

Making the Book:

For anyone who isn't familiar with making a simple one-page folded book, here are the instructions:


The hardest part about making this book is to make sure you fold everything evenly.  If your paper or folding is uneven, your book will be uneven.


Adding Your Text:

For me this makes the book complete, and treat it like poetry. 

I wrote 6 words about stars, printed them out on the computer and cut them out individually.


Then I glued them, one to each page of the inside of the book, leaving the first outer page for the title and the last outer page blank.

You will want to think about where you place each word and the overall design of the page.


For our sun books, some people wrote directly on the page.

After your book is complete and dry, make sure to put it under weights for about a week or so,  so that it flattens out.


Just a reminder our next meeting is on April 12th.  Dina will be demonstrating two book forms.  She will provide all the materials for the books, you will only need to bring the basics, ruler, pencil, Exact-o knife, glue, etc.

Also, please do not forget the Spring page is due for our group book.  The page should be 8 1/2" x 11", hamburger folded and you should make about 15 copies or so to share.

Quote of the Week:  "But I know somehow, that only when it is dark enough, can you see the stars." _ Martin Luther King Jr.


Friday, March 28, 2014

Curiosity Box Project

Hello Everyone,

Just a reminder that we should all be continuing our work on our curiosity boxes.

For anyone having trouble getting started, Nancy recommends looking at Jim Frazer's website - 

http://jimfrazer.shawnrossiter.com/curiosity.html


   He has a lot of interesting pieces and a great description of his boxes.

The other is Pinterest's Treasure Boxes and Cabinets of Curiosity - 

http://www.pinterest.com/search/pins/q=cabinets%20of%20curiosity


Quote of the week:  "Twenty years from now you will be more disappointed by the things that you didn't do than by the ones you did do.  So throw off the bowlines.  Sail away from the safe harbor.  Catch the trade winds in your sails.  Explore.  Dream.  Discover." - Mark Twain

Wednesday, March 19, 2014

March 8th Meeting Recap

We had a good time on March 8th making a sun book using a reverse painting technique that I saw on Pinterest.  If you haven't been over to look at our Pinterest Board, here's the link  Binders Guild Pinterest Board.  There is a lot of wonderful and unique books to hopefully provide some inspiration.

A reminder about the "Seasons" group book (this will be a group book where everyone will contribute a page for each season).  The "Spring" page is due at the next meeting on April 12th.  The theme of this page is "Spring" and it should be 8 1/2" x 11" with the middle fold being a hamburger fold.  That is fold the paper in half along the long side of the sheet.  Your page should be done on both front and back of the paper.  You can complete 4 separate images or just two.  (If you are creating just two images keep in mind that some people will be folding the image in half, so keep in mind that center fold as you are creating your piece.)  And please bring about 15 copies (can be photo copies) to share with everyone on the 12th.

For our next meeting on the 12th, we will be having a book demonstration by Dina on the Tab and Slot book form and the Tea Bag book form.  More information on the supplies you will need in a later post.

Also there was some good feedback for the Milwaukee Art Museums folk art show "Uncommon Folk:  Traditions in American Art".  The show runs through May 4th.  More information at their website Uncommon Folk Art Show

Flow Magazine is now being carried by the Barnes & Noble at Mayfair Mall.  It is a magazine for paper lovers but they often include paper samples and techniques that can easily be transferred or used into book design.  It's worth checking out.

A big thank you too goes to Dianna who showed us her wonderful and very organized "Take Along" bag of work materials, everything she needs to create work anywhere she goes.  It was very inspirational!

It was a great meeting and our sun books came out very nice.  For those who were not able to attend, I will be posting the instructions on the blog later this week.

Quote of the Week: "Nothing in the world is worth having or worth doing unless it means effort, pain, difficulty… I have never in my life envied a human being who led an easy life.  I have envied a great many people who led difficult lives and led them well." - Theodore Roosevelt

Wednesday, February 12, 2014

Valentine's Day Inspiration

Hello Everyone - In honor of Valentine's Day, I thought I would share my Valentine inspiration.  I took an idea I found on Pinterest of felt Valentine's Day Cookies with hand embroidery.  Instead of sewing it all together or stuff it with fluff, I added a single page folded book:


I will bring one to our meeting in March, and I will post the meeting notes from February's meeting soon.

Happy Valentine's Day!


Quote of the Week:  "Everyone has a gift for something, even if it is the gift of being a good friend." - Marian Anderson


Friday, January 31, 2014

Pocket Accordion Bond Book

Hopefully everyone is surviving the long winter.

Here are the instructions for the second book we created at our last meeting - the "Pocket Accordion Bond Book".

*Just a quick note - I have changed the sizes to fit the book I was doing.  These will be different from the ones on the instructions Nancy handed out.


Supplies:

For Outside cover - one 2 3/8" x 11 1/2" paper sheet
                                There will be an accordion fold in this sheet, so 
                                choose paper that's not heavy and can fold and 
                                hold easily.


For Inside Pages - six 3" x 5 1/2" sheets of paper.  Once again, not 
                              too heavy.

You will also need -
                                Ruler
                                Bone folder
                                Pencil
                                Glue


Start by gathering materials -


Fold the 6 inside pages first.  

Starting with the paper in a horizontal position,Measure 1" up from the bottom of the page and score a line across the whole sheet.  


Then fold the bottom edge up.

Keeping the bottom edge fold, fold each sheet in half vertical, so the horizontal fold is to the outside.

You will need to do this with each of the 6 pages.  When you get done, they'll look like this - 


Sorry for the blurry photo.  Hopefully you can somewhat see what they should look like.

Set those pages aside.

Folding the cover - 

With your 2 3/8" x 11 1/2" paper in the horizontal position, starting from the left side of the paper, measure and score a line 3" from the edge.


Then starting at the 3" mark, measure and score 12 lines - 3/8" apart.  This will be for the accordion fold binding.

Take your time measure and scoring.  This binding is not very forgiving and things can get wonky if the measuring and scoring isn't precise.

After the 12th scored line, measure 3 inches and score again.

After score you will want to fold.  Valley…Mountain…Valley….Mountain…etc.  (See diagram below)


You will have some extra at the end.  I'll come back to that.

Next, its time to center (I just eye-balled it) and glue the each side of inside pages (that you folded earlier) to each side of a mountain fold.


Make sure the pocket is facing in the right direction.  Not just that it is on the outside, but also that it is on the bottom and not the top.


You will notice that the inside edge of the pocket is not glued down.  


You can glue it now if you wish or leave it as is.  You could even fold or cut a decorative edge to it.


After the book is completely glued,  you can choose what to do with the left-over edge of the cover.


You can cut it off and align the front and back covers or what I did was to make 2 additional score and folds and create a folded closure for the book.


Thanks again to Nancy for demonstrating!


Quote of the Week - "I always wanted to be somebody, but now I realize I should have been more specific." - Lily Tomlin