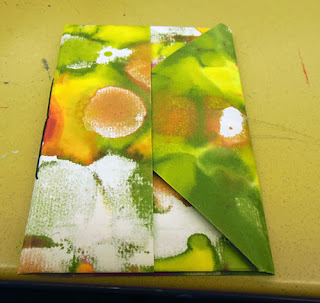
Sorry for the delay, this is from our October 12th meeting. (Sick child at home.)
We had a great meeting on the 12th. A big thank you to Chris Klein who demonstrated our book selection this month. And a thank you to Carolyn for the Spicy Tomato Muffins! They were delicious.
Here's what we did to make Hedi Kyle's Diagonal Pocket Fold Book:
Materials:
For folder: 12" x 20" text weight paper
For signatures: 3 - 6 sheets of
5 1/2" x 8" paper folded in half
Ruler
Pencil
Bonefolder
Awl
Needle
Thread
Step 1: The folder
Put the 12" x 20" face down and measure and mark the center of the 12" side of the paper. Fold each side to the middle mark. It will look like this:
Then unfold and keeping it vertical, you need to make a mark 8" up from the bottom and fold the bottom up to that mark. You will need to fold that fold over two more times. So you will have three 4" folds on one end of the paper.
From there, you need to reverse fold the #2 fold up to #3. Hopefully you can see it in this picture.
Now, (see picture above) fold both corner to the first vertical long folds.
You then need to take those folds and flip them up, so the corner folds you just made will be facing down.
You will need to fold the bottom corners in to the horizontal folded line. (My picture isn't too good, but I'll show it.)
Flip the horizontal fold down, over the two corner folds you just made.
Refold sides to the middle along those first long vertical folds. When you turn it back over, it should look like this:
That is one side. Now you will need to fold the other side.
Fold the two corners to the middle. Then fold the middle edge up, so that it aligns with the edge of the paper.
You will need to take a bone folder and score the edge of the last fold, like this:
This step is very hard to explain. Unfold the last two folds and sticking your finger inside, pop the fold out and flatten it along the scored line into a kite shape. Hopefully pictures will help.
Tuck the two ends into each other.
Tuck the top edge of that inside. So the edge looks like a triangle.
Now you can fold it into a folder. Using the edges of the pockets as your guide.
Then fold over to form the folder.
Next, you will want to sew in your signatures. Start by piercing three holes (about an 1" apart) into your signatures.
Then you will need to align the signatures on the inside folder and pierce holes through the folder. Using a simple pamphlet stitch and waxed thread sew in your pages.
I did the tie on the inside, but you can choose to put it on the outside, simply by changing where you start your stitch.
And the booklet is complete!
I did take a picture of the insides folds.
Thanks again to Chris. This was a great book. Very inspiring.
Thanks too, to all who came and shared.
Save the Date! Our next meeting is November 9th.
Quote of the Week: "When my kids become wild and unruly, I use a nice, safe playpen. When they're finished, I climb out." - Erma Bombeck


Thank you. You made this clearer than in the Playing with Paper book.
ReplyDeleteGratefully,
YC
In the first part of the directions, I am missing something...fold to the horizontal line, but you don't number them. It could be folder to several different horizontal lines. I get it to the first corner folds, but then have trouble for the next couple of steps....
ReplyDeleteIf you would like to see my folders, they are on my blog at:
ReplyDeletevaversproductions.blogspot.com
I use any size paper and add my own "extensions" to it. Once you figure out how to fold them , they are fun to make. Thanks for the tutorial.
Renate
What a lovely little album ! I totally adore all your little touches throughout.. You have such a good eye for design!Learn to more about 6x9-presentation-folders
ReplyDeleteYou have really done great job by sharing the beautiful post. Thanks lot for the informative post. Learn more about custom pocket folders
ReplyDeleteYou have really done great job by sharing the beautiful post. Thanks lot for the informative post. Learn to read more about Christmas Two pocket folders
ReplyDelete